Work down the below checklist to ensure your hardware is connected correctly.
Your Genexis (ONT) box should be plugged in as the image below shows
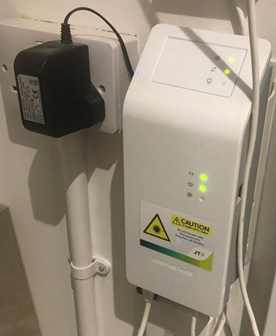
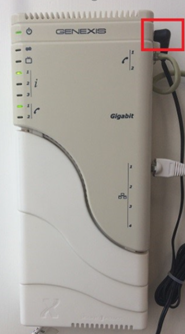
1. If there are no lights lit on the box, there is something wrong with the power connection. Ensure that the black power lead is plugged in securely and the plug inserted and turned on at the mains.
2. The ethernet cable should be plugged into the port labelled ‘1’ on the Genexis box. The other end of the ethernet cable should be plugged into the WAN port on your router.
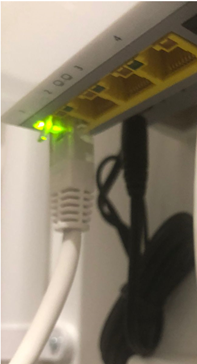
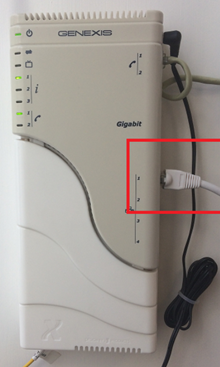
3. Unplug the Genexis box and wait 10 minutes, then reconnect to the power. If the lights fail to turn on after waiting a further 2 minutes, the issue may be with your power socket.
4. If the lights turn on but your Wi-Fi still isn’t working, check that your router is plugged in and the lights are functioning according to your individual router model manufacturer’s guide.
5. You can find your specific router model’s guide and troubleshooting tips on the router manufacturer’s website.
6. If all the above has been completed and you are still unable to connect, please report a fault – see below.
Please complete our Report a Fault form.
The best way to optimise your Wi-Fi signal and speed is to situate your router openly and unobstructed at the heart of where you use devices in your home, such as in the living room, rather than shut away in a cupboard.
The SSID is the name of the network that appears on the list of networks when your device scans for Wi-Fi. Your SSID can be found printed on the base of your router where you will also find the password key to access the network.
You can change your SSID and password to one that’s easier to remember by logging into your router’s admin login portal through your browser
Configure your existing router to switch over to the Airtel network in 4 steps -
1. Connect your computer to the router via Wi-Fi or ethernet cable.
This is usually easiest using a laptop or desktop computer.
2. Access the router’s admin login portal through your browser by entering the IP address into the address (URL) bar.
The IP address will usually be 192.168.1.1. However, this may not be the case with all routers. You will be offered further advice and guidance on how to configure your new network settings upon switching to our service, this will include the specific IP address you will need to access your router.
3. Sign in to your router’s admin login portal using your router login details
If you haven’t previously changed these login details, they will most likely still be the default login details. For specific details on how to access and navigate your router’s admin login portal, including the default login details, go to your router brand’s website for guidance on how to access your specific model.
4. Enter your new Airtel network login details.
Your new Airtel network log-in details will be emailed to you after you switch to the Airtel broadband service.
For more guidance on setting up your router, please contact Customer Services.
Simply fill out our Move of Service Form or visit us in-store. Charges vary by Island.
No need to worry about your router when you’re moving house, your network details will remain configured. Just contact us to switch your service to your new address and take the same router with you.
| Fibre Broadband Connection Charges | |
|---|---|
| Switching broadband service to Airtel | £15.72 |
| Switching landline service to Airtel | Free |
| New landline connection | £49.97 |
| New landline and broadband connection | £65.69 |
| New landline and broadband connection with installation | £128.35 |
| Moving broadband service to a new address | £15.72 |
Follow the below steps to set up your Huawei B315 4G Broadband router
1. To connect to the router Wi-Fi network you can find the details on the label on the base of the router

A - Wi-Fi Network SSID (Name) and respective Wi-Fi Password.
B - IP address that we can use to access the Router Menu using a Web Browser to change any settings.
C - Username and Password when accessing the Router Menu using either the App or the IP address.
2. Once connected to your Wi-Fi network install the Huawei HiLink App by entering ‘192.168.8.1’ into your address bar (URL) in your web browser. This will take you to the following screen
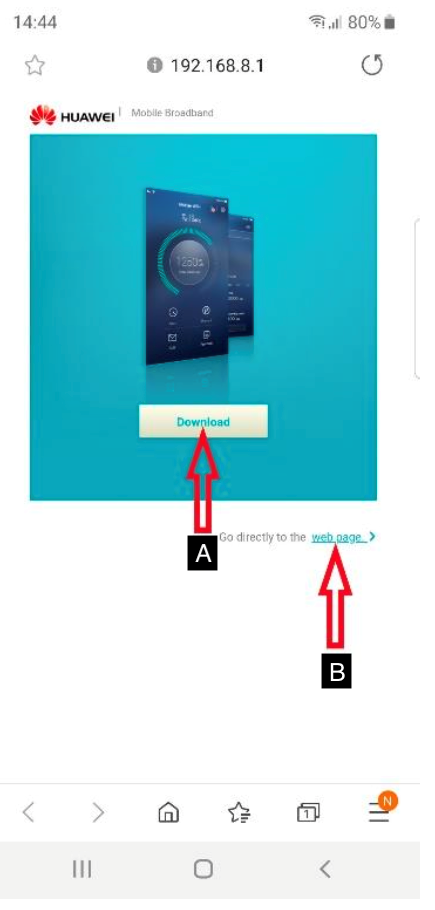
A – Click on Download to download the Huawei HiLink App to your phone (alternatively, you can download the App directly from Google Play Store (Android) or App Store (IOS).
B – If you don’t want to download the Huawei HiLinkApp and prefer to access the menu directly on the Web Browser, simply select the ‘Web Page’ option below the download image.
3. Install the Huawei HiLink app as per the onscreen instructions on the Google Play or App Store.
4. Once installed, open the app and accept the Huawei HiLink Privacy Notice terms.
5. Swipe along the following screens until you reach Quick Sharing and select ‘Start’ to start the App configuration.
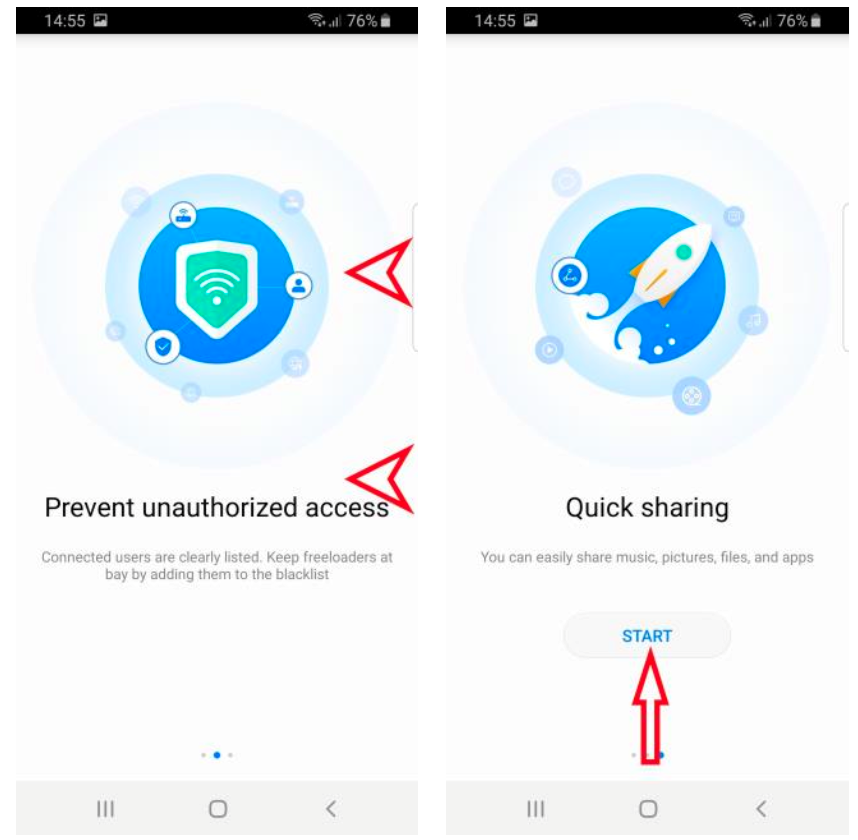
6. Allow Huawei HiLink to access this device’s location and select ‘Set Up’ when prompted
7. Follow the onscreen instructions until you get to the below screen and select ‘ignore’ to progress to the next step
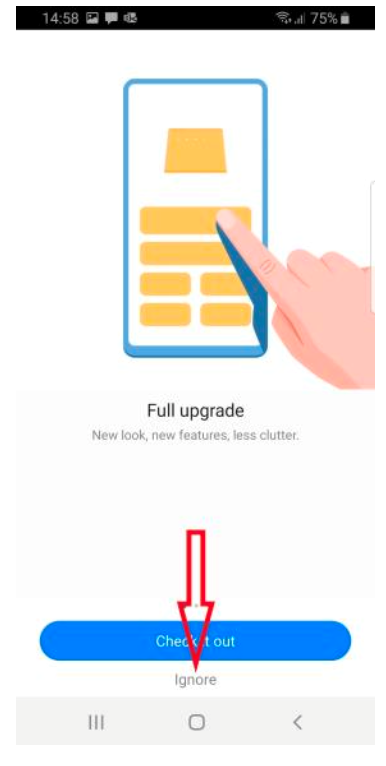
8. Once you reach the setup screen, you can change your network name and password to one of your choice (highlighted by the red arrows in the image below) and then select ‘Next’
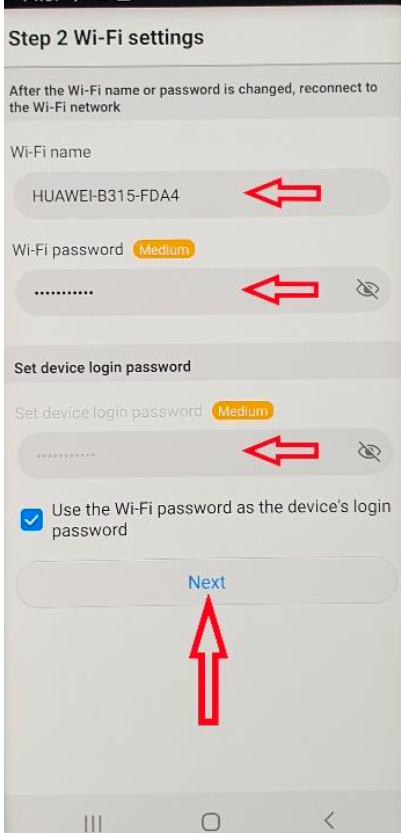
9. After the network setup, it will then take you to the main menu, as shown below
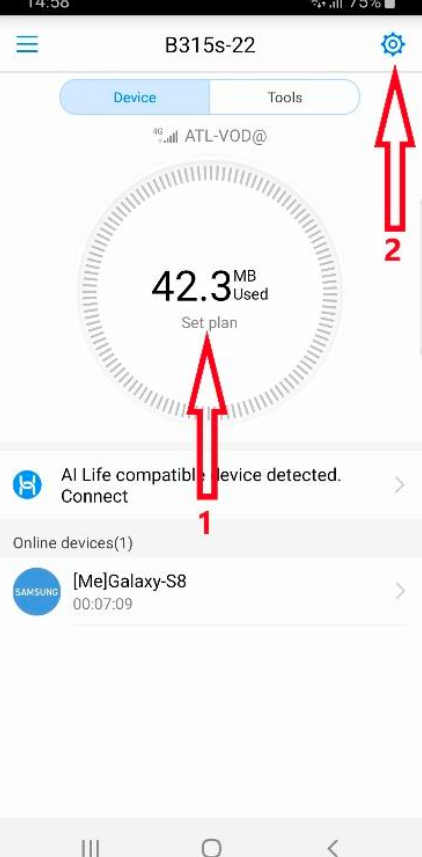
10. To set your data usage and plan, select the arrow numbered 1 in the above image. It will take you to the ‘Volume’ screen. Here, select Settings to take you to the Traffic Settings.
11. Enable the ‘set data monthly plan’ switch to adjust your plan options as shown below.
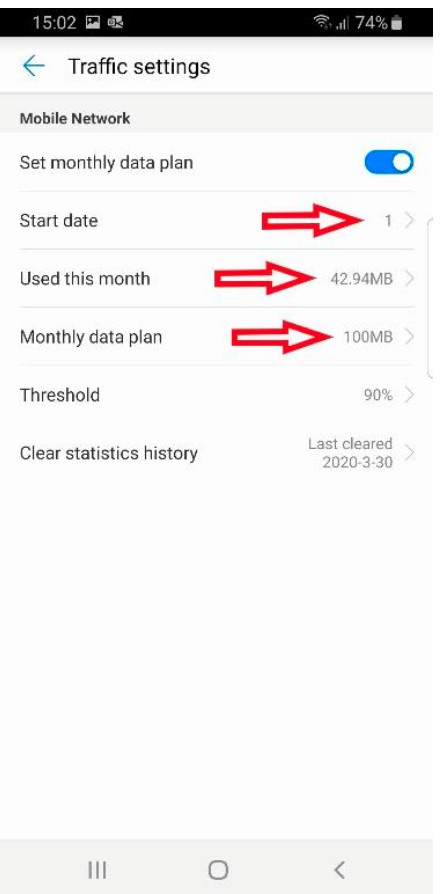
Start Date: Set to the 20th (If on Monthly Data Plan) or if Pay-As-You-Go, leave it as the 1st of each month, or set to the date from your last top-up. This means that the device will automatically reset the data counter to 0 on that same day every month.
Used This month: Check with one of our customer service agents for the amount of data used already and to update the data usage accordingly onscreen.
12. Select Monthly Data Plan to display the below screen
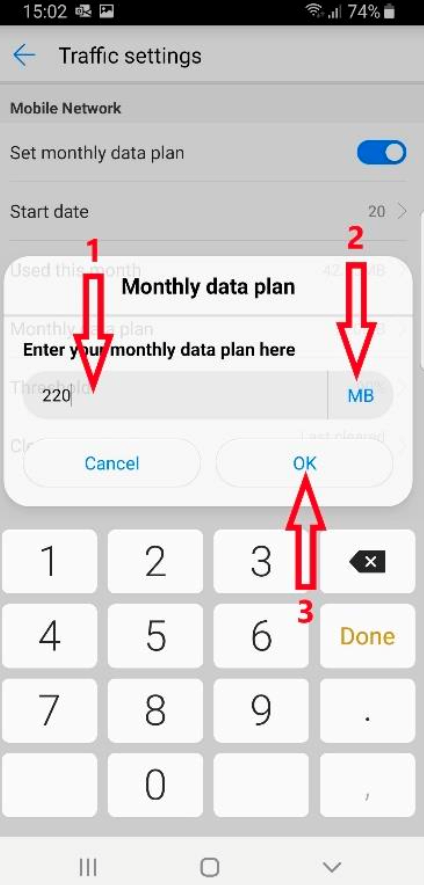
Enter your data allowance amount if on a Monthly Data Plan. If you have a Pay-As-You-Go Data card you can set it to 0 or input the amount of data from the last Top Up. Then change the MB unit to GB.
13. After changes are applied select OK to close the pop-up window. Navigate back to the main menu using the arrows at the top left of the screen.
You should now be able to see your data usage and which devices are connected to your router under Online Devices.
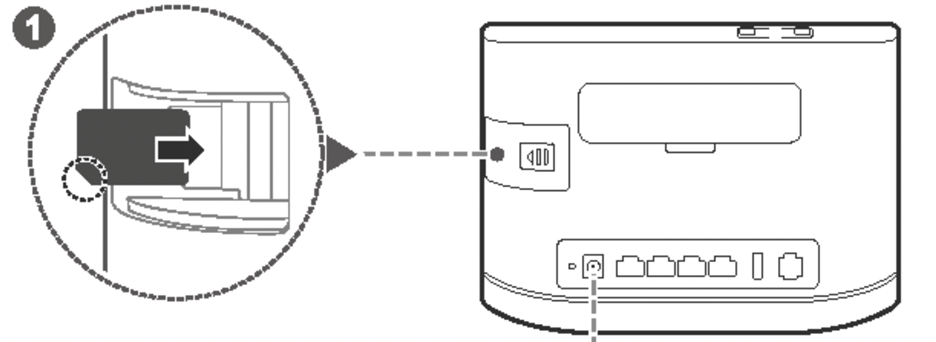
For all common router issues, always ensure you first try turning off your router, waiting 30 seconds, then turning it on again. If this doesn’t resolve the issue and the second light from the left is red, this means the device is not able to connect SIM card to the network. Check through the below troubleshooting steps:
1. Check that the SIM is inserted in the SIM tray correctly as shown on the diagram below.
2. Check to see if you have used up your data allowance.
3. Check to see if you have an unpaid bill.
4. The activated SIM may be pin-locked. Remove the pin lock by contacting customer services.
5. If the problem persists, please contact customer services.
Signal and speed depend on a number of variables including proximity to a mast and number of people using the network ant any one time. The following tips can help optimize your experience.
1. Your 4G broadband router should always be placed by a window to get better signal.
2. Move the router around the house and repeat speed tests to find the location with the best signal.
3. The router should not be placed behind any other electronic devices like microwaves or TVs.
4. Switch off any other devices connected to Wi-Fi which you are not using, e.g. iPads, phones, gaming consoles.
